Wednesday, December 15, 2010

Lattes at Starbucks and Jane LaFazio

Small Art Quilt
Several years ago I took an art quilt class from Jane LaFazio and this is one of the projects I completed. I loved the class and getting to know Jane. She's the artist who painted the original "Tree of Life Oaxaca" that I adapted into needlepoint. It's my current stitching project and what inspired me to start this blog. Jane is one of the most talented persons I know. She creates, teaches, volunteers to teach children, travels and teaches in Italy, San Miguel, Mexico and in the USA. She's a successful business woman, full of energy and loads of fun-a true inspiration!

Yesterday, we met at Starbucks so I could show her my stitched piece and here's what she wrote today on her blog http://www.janeville.blogspot.com/
You can also read more about Jane on her website http://www.plainjanestudio.com/

Thanks, Jane.

Wednesday, December 8, 2010

Grasshopper

Did you know that some people actually eat grasshoppers? Not this one--he's climbing up the border of my Oaxaca Tree of Life design. Besides, he's too pretty to eat! Looks like he's about ready to hop over one of the branches!

Grasshopper
His legs are a combination of Floss Overdye, Trebizon, and Kreinik Metallic; the body is Couched Long Stitches with Neon Rays and Kreinik Metallic; a single Sundance Bead is used for the eye! I love him. His name is Diego.

Friday, December 3, 2010

Hummingbird in Oaxaca Tree of Life

While in Tucson last week for Thanksgiving, we visited the Arizona-Sonora Desert Museum's hummingbird enclosure. The beautiful hummingbirds I saw reminded me of the one that resides on my current stitching project, Oaxaca-Tree of Life. I had such fun creating the tail feathers with Rainbow Flair and one ply of matching Splendor Silk. Then I added a few stitches of Fuzzy Stuff which I also used for the head. Kreinik Braid was used for the beak; Sparkle Rays for the breast; Floss and Splendor complete the wings and neck and the final touch was a bead for the eye. 


Hummingbird


Thursday, December 2, 2010

"Do What You Love" class at TNNA

The National NeedleArts Association (TNNA) will be gathering in January in Long Beach, CA for the largest needlework and yarn trade show in the country. Sundance will be there with Alice Borge, former shop owner and teacher, to teach a class titled "Do What You Love!" We'll instruct shop owners, or their teaching staff, about the latest and greatest threads, stitch techniques, and bead tips. More information may be obtained at the TNNA website www.TNNA.org and click on TNNA's Winter Show then view class schedule and list of classes.


Medaris Heart


Here's Nandra, Alice, and Cassie working on our class project

Friday, November 12, 2010

Beaded Indian Corn

In October we were able to have an adult vacation with my two children, Nandra and David, and my son-in-law, DJ. And, what fun we had exploring New England! Dan and I grew up in the East, but the kids had not experienced the explosion of color that autumn brings to that part of the country. Lighthouses, lobster, pumpkins, corn shocks, picturesque Vermont villages, crisp cool air, apple pie, scenic drives, blueberry beer, and Indian corn were just a few of the cherished memories that forever will be etched in our hearts and minds.

Fall Harvest in Deerfield, Massachusetts

Oaxaca, Tree of Life, my current needlepoint project, has Indian corn in it! So, to make it look natural, I stitched it with raffia, overdyed thread and Sundance Beads to get the full effect.


Indian Corn
I used size 11 beads in yellow and size 14 for the browns. Using the Brick Stitch for doing beads on needlepoint is the best thing since sliced bread! Really! You'll have to try it. Here's the stitch diagram:


The beads nest in the holes instead of on the intersection. You can stitch in horizontal or diagonal rows. Also, it works best on painted canvas. Have fun!

New "Little Stitcher" expected

Announcement! I am going to be a great grandmother; yes our little Lauren is expecting a baby girl in February. That will make 5 generations of stitching women in my family. Wow! All of this got me thinking about the joys of the sisterhood of stitching. I can’t wait to put a needle and thread into the hands of my little granddaughter. I am sure that my mother had the same wonderful creative joy when we sat down to stitch together. Stitching has always been a part of our lives. Even though my mother did not do needlepoint,  we credit her for sharing her “needle sense” with us. The creative expression that comes with stitching is truly priceless, from the explosion of colors, threads and design all combined with the high touch activity of the stitch itself has been a constant companion and source of friendship in my life.

Here is a photograph of the four of us stitching outside on a nice day last spring. However, I think Mother was taking a break!

Sunday, October 10, 2010

Oaxaca

I'm working of a fabulous needlepoint! It's adapted from an original watercolor by Jane LaFazio called "Tree of Life: Oaxaca." There are so many design elements in the piece that I believe it could be broken down into several smaller pieces. So, I'm going to feature these sections one at a time starting with the "Our Lady of Guadalupe." You can see the original painting in its entirety at Jane's website http://www.plainjanestudio.com/Mexico/mexico.htm  I hope to finish it soon so I can have it framed in time for the TNNA market in January. I did teach it in a two day class at the Needle Nook in La Jolla and I'm continuing to stitch with the students twice a month. It's such a fun project!


Threads used for this section are: Gold Frosty Rays, Green Overdyed Wildflowers, Orange Northern Lights Silk, Green blend Kreinik Metallic Braid,Lavender Splendor, Dark Purple Boucle', White/Gold Silk Lame' Braid, Flesh, Black, and Red Flosses, Green Impressions and Red Heart Buttons!

**See the cat peeking into the lower left corner? I'll talk about her next...

Thursday, September 23, 2010

Wire Ribbon Flower for Needlepoint

This is my first blog entry! 


In mid August, I was teaching a class at the Needle Nook in La Jolla, CA and my friend and President of the San Diego chapter of the ANG, Shirley Chin, stopped by. She was intrigued by the flower I was teaching using Wire Ribbon. She asked me to teach it to the guild, which I did by simply demonstrating the process without any written instructions. Later, I decided  the perfect venue for getting the instructions to everyone would be to post to a blog which would finally give me the impetus to get one started! So here we go...


Supply list:

  • 3/4 inch sheer wire ribbon
  • 1 plastic drapery ring
  • Metallic thread (not blending filament or ribbon). I used size 4 Kreinik braid
  • Floss, Splendor Silk or Sewing Thread to match the ribbon
  • Something for the center--such as beads or French Knots. I used a Sundance Margarita Flower Bead attached with a Seed Bead.


My flower is three inches in diameter and I have eight petals. 


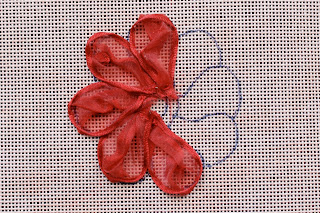
1.  Cut the wire ribbon into 8-3" lengths and fold in half without making a crease or fold line.


2. Fold one side (this will become the back side of the flower) into a V shape.
3. Crimp the V shape together and turn down the top right slightly. Then turn the right edge over only the width of the wire. This basically closes the the opening at the back of the petal.


4. Open the front and fold back the bottom edges. 


5. Attach to the canvas at the center. Secure with a tapestry needle or a pin. Gently open the petal to the desired shape and size and tack into place with selected thread using very small stitches around the edge.                  


6. Repeat steps 1-5 until all the petals are complete and attached to the canvas.


7. Cover the ring with the Buttonhole Stitch. Leave a long tail at the beginning and end which you will thread to the back of the canvas and use to anchor the ring into place.


8. Once the covered ring is secure, use the metallic to make long stitches in the center of each petal (see finished photo at the top.)


9. Finish by filling the center with a cluster of beads, French Knots, or embellishment of your choice.


Note: This technique works best on a painted or colored canvas unless you're using white ribbon on white canvas.


Finishing suggestions: Stitch the background and mount into a small box top, or make into a small pouch, fill with lavender, and use as a sachet.


We at Sundance Designs hope you enjoy using this technique for making flowers on needlepoint canvas. Please be reminded that this is copyrighted material for personal use only and is not to be reproduced by any means without written permission.