In mid August, I was teaching a class at the Needle Nook in La Jolla, CA and my friend and President of the San Diego chapter of the ANG, Shirley Chin, stopped by. She was intrigued by the flower I was teaching using Wire Ribbon. She asked me to teach it to the guild, which I did by simply demonstrating the process without any written instructions. Later, I decided the perfect venue for getting the instructions to everyone would be to post to a blog which would finally give me the impetus to get one started! So here we go...
Supply list:
- 3/4 inch sheer wire ribbon
- 1 plastic drapery ring
- Metallic thread (not blending filament or ribbon). I used size 4 Kreinik braid
- Floss, Splendor Silk or Sewing Thread to match the ribbon
- Something for the center--such as beads or French Knots. I used a Sundance Margarita Flower Bead attached with a Seed Bead.
My flower is three inches in diameter and I have eight petals.
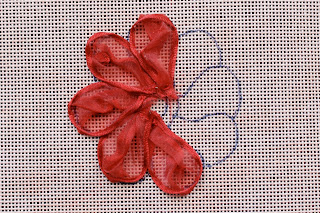
1. Cut the wire ribbon into 8-3" lengths and fold in half without making a crease or fold line.
2. Fold one side (this will become the back side of the flower) into a V shape.
3. Crimp the V shape together and turn down the top right slightly. Then turn the right edge over only the width of the wire. This basically closes the the opening at the back of the petal.
4. Open the front and fold back the bottom edges.
5. Attach to the canvas at the center. Secure with a tapestry needle or a pin. Gently open the petal to the desired shape and size and tack into place with selected thread using very small stitches around the edge.
6. Repeat steps 1-5 until all the petals are complete and attached to the canvas.
7. Cover the ring with the Buttonhole Stitch. Leave a long tail at the beginning and end which you will thread to the back of the canvas and use to anchor the ring into place.
8. Once the covered ring is secure, use the metallic to make long stitches in the center of each petal (see finished photo at the top.)
9. Finish by filling the center with a cluster of beads, French Knots, or embellishment of your choice.
Note: This technique works best on a painted or colored canvas unless you're using white ribbon on white canvas.
Finishing suggestions: Stitch the background and mount into a small box top, or make into a small pouch, fill with lavender, and use as a sachet.
We at Sundance Designs hope you enjoy using this technique for making flowers on needlepoint canvas. Please be reminded that this is copyrighted material for personal use only and is not to be reproduced by any means without written permission.


